So, have you purchased a custom domain for your lovely blog? If yes, then you need to set your DNS (Domain Name System) to add your blog with your new custom domain.
DNS (Domain Name System) settings provided by your hosting company and with it you can control your domain to use.
After setting successfully your blog can be access with your own purchased custom domain. Don’t worry about your traffic, your old blogspot domain name will automatically redirect to your new custom domain name.
READ THIS: 11+ Reasons Why Should Buy A Custom Domain For Blogger Blog

If you will buy a custom domain/ top level domain name from blogger blog, you don’t need to setting DNS (Domain Name System), because Blogger will automatically setting your custom domain name for your blogger blog.
But if you will buy a custom domain from a different hosting company or from your local country area then you must need to modify your DNS (Domain Name System) settings. Let’s see how to setup a custom domain name to blogger blog...
SEE ALSO: How to Host Subdomain In Hosting And Main Domain In Blogger?
2. Find DNS (Domain Name System) management settings page. This page can be located at your hosting dashboard, tab or dropdown menu. Just find it anyway.
3. Inside your DNS managent page you will find two records name. These are CNAME Records and A-Records. CNAME records connects your blog with your own purchased custom domain name.
4. Click Advance Settings or Manual Settings if you see any link like these.
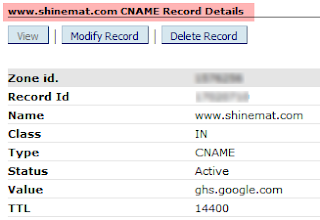
5. Click CNAME Records or Add CNAME Records. Inside your CNAME Records window type "www" in "Name" box. Then enter ghs.google.com where it asks for "Host Name"
6. Click Save and you are almost done.
An example for a "CNAME"

Example: (shinemat.com) » » » (www.shinemat.com)
From my personal experience I can say many visitor don’t type "www" before your web URL(s). So if you don’t set your A-Records for your custom domain you will lose huge amount of traffic because they will see an error notification page. So it’s very important, and don't forget to create A-Records. You need to create 4 A-Records only.
1. Similarly before, find A Records under DNS management page.
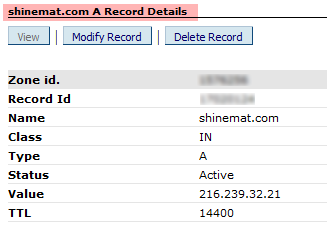
2. Inside A Records window type your custom domain name without "www"
3. In "A" section enter the following IP addresses. Remember, 1 IP for 1 A Record. That means 4 A-Records.
4. After creating four A-Records you are finished second part.
An example for a "A Record"

1. Log in to your Blogger Blog account
2. Click on your blog title
3. Select Settings from left side menu.
4. Click Basic
5. Find Publishing, Blog address
6. Click Add a Custom Domain
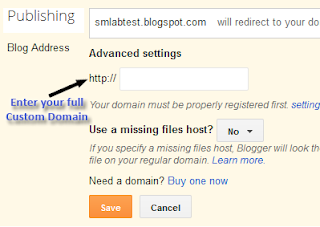
7. Click Switch to advanced settings
8. In Advance Settings type your full custom domain name.
Example: www.shinemat.com
9. Click Save and you are fully done.

Now wait at most 24 – 48 hours for completing all update and process. Then you and your worldwide visitors can browse your blog with a new, fresh and professional looking domain name.
If you have any problem please ask me friendly. I will try to serve you my level best. Have Fun! :-)
DNS (Domain Name System) settings provided by your hosting company and with it you can control your domain to use.
After setting successfully your blog can be access with your own purchased custom domain. Don’t worry about your traffic, your old blogspot domain name will automatically redirect to your new custom domain name.
READ THIS: 11+ Reasons Why Should Buy A Custom Domain For Blogger Blog

If you will buy a custom domain/ top level domain name from blogger blog, you don’t need to setting DNS (Domain Name System), because Blogger will automatically setting your custom domain name for your blogger blog.
But if you will buy a custom domain from a different hosting company or from your local country area then you must need to modify your DNS (Domain Name System) settings. Let’s see how to setup a custom domain name to blogger blog...
SEE ALSO: How to Host Subdomain In Hosting And Main Domain In Blogger?
Settings for "CNAME Record"
1. Log in to your hosting account with your User ID/ Email and password.2. Find DNS (Domain Name System) management settings page. This page can be located at your hosting dashboard, tab or dropdown menu. Just find it anyway.
3. Inside your DNS managent page you will find two records name. These are CNAME Records and A-Records. CNAME records connects your blog with your own purchased custom domain name.
4. Click Advance Settings or Manual Settings if you see any link like these.
5. Click CNAME Records or Add CNAME Records. Inside your CNAME Records window type "www" in "Name" box. Then enter ghs.google.com where it asks for "Host Name"
6. Click Save and you are almost done.
An example for a "CNAME"

Settings for "A Record"
This setting will help you to find your blog when some one type your blog address without "www" Example: shinemat.com. This is called naked domain. This setting will redirect your blog from naked domain to your full domain.Example: (shinemat.com) » » » (www.shinemat.com)
From my personal experience I can say many visitor don’t type "www" before your web URL(s). So if you don’t set your A-Records for your custom domain you will lose huge amount of traffic because they will see an error notification page. So it’s very important, and don't forget to create A-Records. You need to create 4 A-Records only.
1. Similarly before, find A Records under DNS management page.
2. Inside A Records window type your custom domain name without "www"
3. In "A" section enter the following IP addresses. Remember, 1 IP for 1 A Record. That means 4 A-Records.
216.239.32.21

216.239.34.21

216.239.36.21

216.239.38.21
4. After creating four A-Records you are finished second part.
An example for a "A Record"

Custom domain settings for blogger blog
It is final step. Just follow me.1. Log in to your Blogger Blog account
2. Click on your blog title
3. Select Settings from left side menu.
4. Click Basic
5. Find Publishing, Blog address
6. Click Add a Custom Domain
7. Click Switch to advanced settings
8. In Advance Settings type your full custom domain name.
Example: www.shinemat.com
9. Click Save and you are fully done.

Now wait at most 24 – 48 hours for completing all update and process. Then you and your worldwide visitors can browse your blog with a new, fresh and professional looking domain name.
That's All.
If you have any problem please ask me friendly. I will try to serve you my level best. Have Fun! :-)

i have a problem my blog www.bloggerfreaks.com
ReplyDeleteis not showing titles when i share articles on facebook or anywhere else instead of title it shows the blogger name i.e 'Blogger Freaks'
@meesum raza How do you update your posts in facebook? Is it manually or automatic? If manually sometimes it happens. To update your posts automatically use http://dlvr.it/
ReplyDeleteThanks and if you need further help just knock me.
@Saimoom
ReplyDeletei do it manually bro! but it should fetch the post title because it do for some posts like 'Dota 2 Giveaway' post.. :/ it starting happening after switching to customdomain
@Saimoom
ReplyDeletei update manually but the problem is that it works fine with two three posts but not for all of them :/ its happening after i switched to customdomain..
@meesum raza Its not for custom domain brother! It may be happen if manually update. See my fan page, (http://www.facebook.com/likeshinemat) there is no post without post title. Will you try http://dlvr.it/ ? I think by using this your problem will not be exist.
ReplyDeleteLet me know, if you feel any problem.
Thank you.
Brother, Great post. Your post is very interesting and arranged to see in my eyes.
ReplyDeleteI have learned a new information from your article.
I am inspired from you for my blogging carrier.
Today I read your 5 sweet article.
Thank you Saimom brother
@Emdadul Hoque Jewel Thanks for being a regular reader of ShineMat. I am very glad to see your warm participation.
ReplyDeleteYeah... Nice article! I like it. I'v got information for "custom domain" my blog. Thanks so much.
ReplyDeletePost a Comment
Please DON'T spam here. Spam comments will be deleted just after our review.