So, have you got your AdSense account approved? If yes, then you are so lucky and you just enter the world of make money online with a global trusted brand Google.
Don’t think your all work is finished. Because now you have to monitor your AdSense account every minute to not get it banned. It's time to create and install Adsense ad code to blogger blog.

Are you excited to see the live ads on your blog?
Wait…
Before we go beyond we will discuss some important facts about using AdSense ad code.
Well, these are very common issues you have to follow very seriously. We have discussed widely on What You Should Not Do To Keep AdSense Account Safe.
Let’s start:
1. Login to your AdSense account using your Gmail ID and password that you have used to sign up.
2. Click My ads from left side of dashboard.
3. Click +New ad unit button.

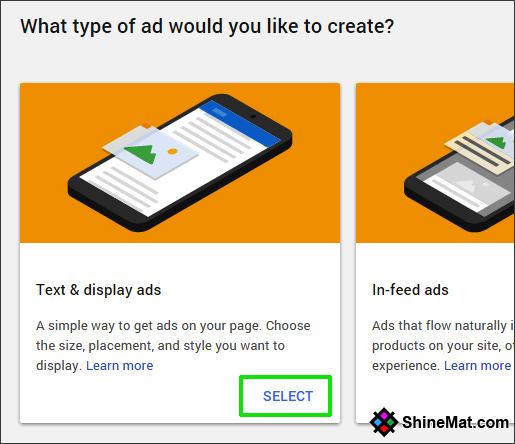
4. Select Text and display ads.

5. Now enter your Ad unit name.
6. Select your desired ad size. We recommended to use Responsive Automatic size. It will fit your ad unit automatically.
7. Select ad type what you want to show. Text ads, image/ video ads or both.
8. From text ads style you can select the font color, size, and style as your blog design to make your text ads matchable.
9. Custom channels is an advanced label feature that helps to show the performance of various ad units in a single group. No Need To Do Anything Here. Leave It.
10. Select if no ads available to “Collapse the ad unit, otherwise show blank space (Default)”
11. Finally click Save and Get code.

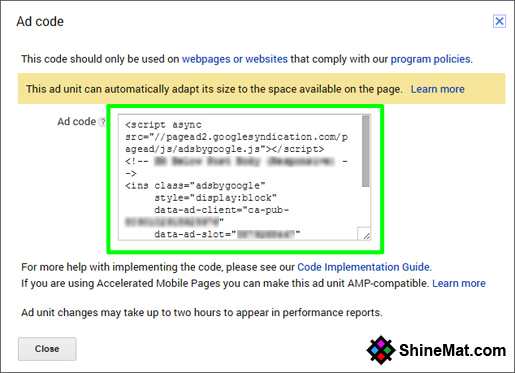
A popup window will display your Adsense Ad code. Just copy the ad code.

12. Now go to your blogger blog.
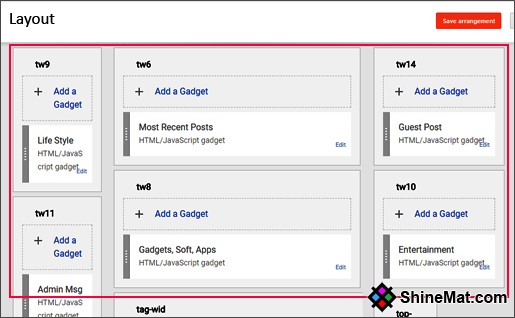
13. Select Layout from left side.
14. Find out the position where you want to show your ads and click Add a gadget link.

15. Select HTML/JavaScript and paste the AdSense ad code in the box.
16. Click Save button.
17. And, click Save Arrangement button from layout page.
That’s all. Now reload your blog and you will see the ads on your blog. If your ads showing blank, wait for few minutes.
Are you happy?
I am sure you are very happy to see the AdSense ads for the first time. Actually, it is the happiest moment because I felt it when I first saw the ads running on my blog.
Now as this way you can create more ad units for your blog or web pages. Just make sure that you follow AdSense conditions and monitor your AdSense account daily.
Also keep your blog update with latest posts daily. Remember, AdSense is nothing if you don’t have massive traffic to your blog.
I am taking your leave now. I will come with a new post next day. Stay well and be happy. Wishing you a great blogging life. Allah Hafez.
Don’t think your all work is finished. Because now you have to monitor your AdSense account every minute to not get it banned. It's time to create and install Adsense ad code to blogger blog.

Are you excited to see the live ads on your blog?
Wait…
Before we go beyond we will discuss some important facts about using AdSense ad code.
- You can’t click on your own ads and even for checking.
- Never try to encourage others to click on your ads.
- Don’t customize AdSense ad code manually.
- Don’t use any Advertisement label.
- Stop publishing any harmful contents. Such as: adult, crack soft, copyright contents etc.
- Never use PTC programs to generate traffic or click.
- Never use Ad code to non-supported AdSense language blog or website.
- Make a balance between your ads and contents.
Remember, Google is more clever than you.
Well, these are very common issues you have to follow very seriously. We have discussed widely on What You Should Not Do To Keep AdSense Account Safe.
READ ALSO: How To Start A Business Without Any Money?
Let’s start:
1. Login to your AdSense account using your Gmail ID and password that you have used to sign up.
2. Click My ads from left side of dashboard.
3. Click +New ad unit button.

4. Select Text and display ads.

5. Now enter your Ad unit name.
6. Select your desired ad size. We recommended to use Responsive Automatic size. It will fit your ad unit automatically.
7. Select ad type what you want to show. Text ads, image/ video ads or both.
8. From text ads style you can select the font color, size, and style as your blog design to make your text ads matchable.
9. Custom channels is an advanced label feature that helps to show the performance of various ad units in a single group. No Need To Do Anything Here. Leave It.
10. Select if no ads available to “Collapse the ad unit, otherwise show blank space (Default)”
11. Finally click Save and Get code.

A popup window will display your Adsense Ad code. Just copy the ad code.

12. Now go to your blogger blog.
13. Select Layout from left side.
14. Find out the position where you want to show your ads and click Add a gadget link.

15. Select HTML/JavaScript and paste the AdSense ad code in the box.
16. Click Save button.
17. And, click Save Arrangement button from layout page.
That’s all. Now reload your blog and you will see the ads on your blog. If your ads showing blank, wait for few minutes.
Are you happy?
I am sure you are very happy to see the AdSense ads for the first time. Actually, it is the happiest moment because I felt it when I first saw the ads running on my blog.
LOVE TO READ: How To Find Low Quality Content And Fix Them
Now as this way you can create more ad units for your blog or web pages. Just make sure that you follow AdSense conditions and monitor your AdSense account daily.
Also keep your blog update with latest posts daily. Remember, AdSense is nothing if you don’t have massive traffic to your blog.
I am taking your leave now. I will come with a new post next day. Stay well and be happy. Wishing you a great blogging life. Allah Hafez.

Post a Comment
Please DON'T spam here. Spam comments will be deleted just after our review.